
Data can be available in different formats, and based on how we want to process or analyze the data, we have to organize it strategically to meet our goals. One of the simplest ways to store records is in a text file, and separate the entries by a comma (,). This type of file is called a CSV file, where CSV is the acronym of Comma separated values.
Due to its simple organization, a CSV file can easily be imported to spreadsheet programs like Microsoft Excel, OpenOffice Calc, or even Google Sheets. While it is extremely straightforward to import a CSV file to Microsoft Excel, simply by opening the file in Microsoft Excel, the process is a little different in Google Sheets. So, today I will basically talk about how to import a CSV file into Google Sheets. It isn’t that tough but you need to know the steps.
Advantages of a CSV file
There are several advantages of a CSV file. The biggest advantage is, that a CSV file consumes less space compared to other types of files having the same set of records. The reason is, that a CSV file is a simple text file, devoid of any formatting, and the values are separated just by commas, making it easy for different programs to differentiate between the entries.
Due to the simple organization of a CSV file, with comma separation, a CSV file can easily be viewed in a text editor, and any changes could be made pretty easily. If you want better visibility of the data, perform data analysis, you can easily do that by importing it to a spreadsheet program or anywhere else.
It is the simplicity that is the beauty of CSV files.
How to import a CSV file into Google Sheets?
Open Google Sheets, and either create a new document or open an existing one. If you have opened an existing sheet, create a new sheet within the file. Now, click on the ‘File’ menu, and then click ‘Import’.

Importing a CSV file
Now, you can import the file in four different ways.
You can import a CSV file from a location within your Google Drive from the ‘My Drive’ tab. If you go with importing a CSV file from your Google Drive, just navigate to the path where the file exists, select the file, and then click on ‘Select’.
If a CSV file is shared with you on Google Drive, you can add that, as well, from the ‘Shared with me’ tab.
A recently opened CSV file can also be imported from the ‘Recent’ tab.
If you have a CSV file on your computer, you can also upload that from your computer from the ‘Upload’ tab. Just select your way of adding a CSV file to Google Sheets. Simply click ‘Select’ after you select the file in all the above three cases.
However, I will go with the fourth option, i.e. upload a CSV file from my computer.
Click on ‘Upload’ and then click on ‘Select a file from your device’.

Wait for a few minutes till the file is uploaded, and after it is uploaded, you have a few options. Now that it is known to you how to import a CSV file into Google Sheets, here’s the next step to add or organize the imported data within Google Sheets.
Organizing the data within Google Sheets
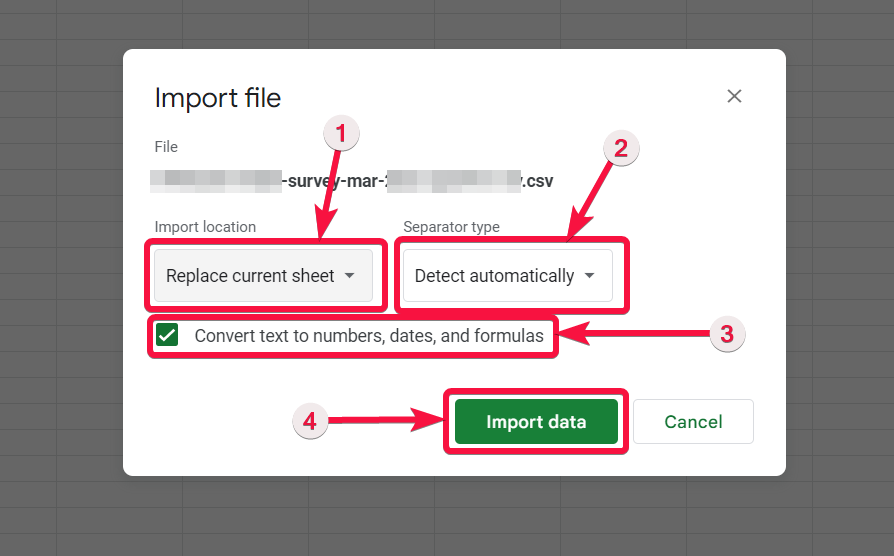
You can either import the file to a new spreadsheet, replace the existing sheet, append the file contents to the existing sheet, or create new sheets to fit the content in. Simply choose the option from the drop-down menu corresponding to ‘Import location’, and import a CSV file into Google Sheets.
Using the Import location option
Here’s a brief explanation of the options.
Create new spreadsheet: This option will import the CSV file to a new spreadsheet within the root directory of Google Drive. The file will have the same name as the name of the CSV file.
Insert new sheet(s): This will add the CSV file and the contents will be populated within a new sheet within the same file. The name of the new sheet will be replaced with the name of the CSV file.
Replace spreadsheet: This option will replace the contents within the current file, by the contents within the CSV file. Any other sheet within the file will also be deleted.
Replace current sheet: This option will replace the contents within the current sheet. However, any other sheets and the contents within the same file will be intact, unlike the last option.
Append to current sheet: This will add the contents of the CSV file at the end of the sheet. Here, the end of the sheet means the last row, where entries exist.
Replace data at selected cell: This option will add the contents of the CSV file, right from the selected cell.
I will go with the ‘Replace current sheet’ option.
Selecting the Separator type
Here, the final step to import a CSV file into Google Sheets is to can select the delimiter, which is a comma (,) in the case of a CSV file. Google Sheets will automatically detect it. However, if you have a custom file that is delimited by a tab, or any other custom character, you can set that from the drop-down menu corresponding to the ‘Seperator type’ option.
You can also go with converting the text in the CSV file to numbers, dates, and formulas by checking the option that says ‘Convert text to numbers, dates, and formulas’. However, if the CSV file has bank account numbers, or any other large numeric data, make sure you uncheck the option, else the numbers will be converted to exponential values. After you are done, click on ‘Import data’ button.
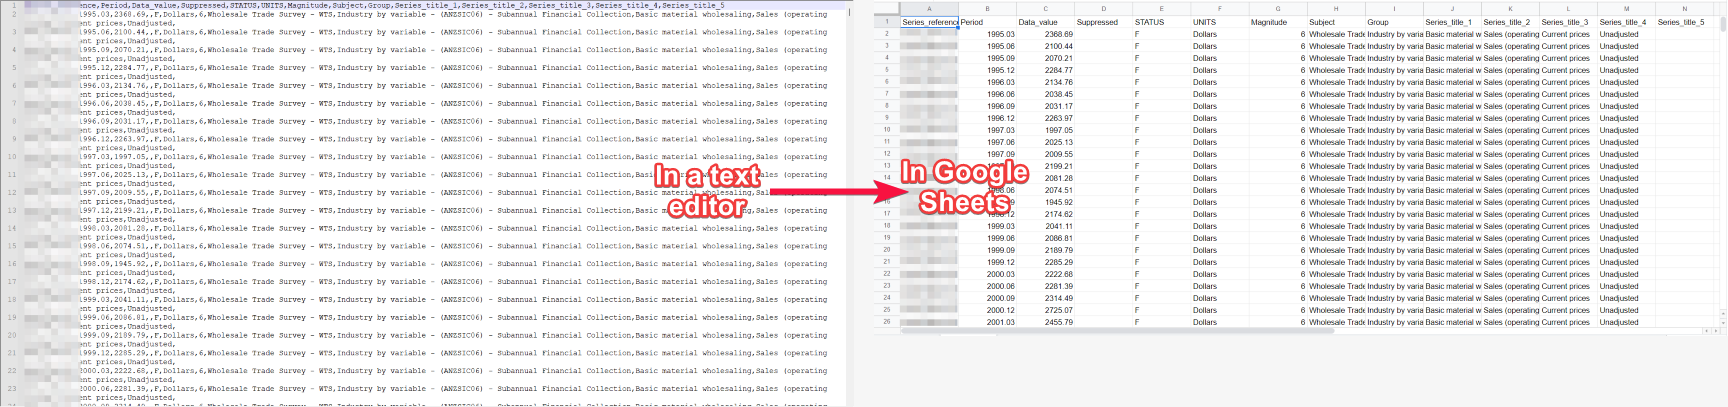
Now that the CSV file is imported to Google Sheets, you can organize the data exactly the way you like, using the powerful tools within Google Sheets. You can filter data, freeze the top row, create a chart for presentation, and do a lot more.
Here’s what your file will look like after you import a CSV file into Google Sheets.
So, that’s how to import a CSV file into Google Sheets, and that is pretty simple. Do you have any questions? Feel free to comment on the same below.
Comments
Post a Comment